greenMeter 2.0 User Manual and FAQ   
Revised August 18, 2009


The greenMeter Interface

The greenMeter interface has two main parts. The upper portion of the screen shows three different eco-driving efficiency displays and six different graphs, which can be switched by tapping the screen. The available graphs include engine horsepower (HP or kW), fuel economy (mpg or km/L), fuel consumption (gal/100mi or L/100km), fuel cost (per 10000mi or 10000km), carbon footprint (tons/10000mi or tonnes/10000km), and energy impact (barrels/10000mi or barrels/10000km).


The graphs show the level of each quantity across a speed range (0-100mph or 0-200km). With the exception of fuel economy, all graphs consist of a stacked bar showing portions due to rolling resistance (purple), aerodynamic drag or wind resistance (blue), and acceleration (red). The purple and blue portions are determined by your vehicle characteristics and speed. The red acceleration portion is directly under your control and can be minimized with careful throttle inputs. Together, these contributions stack up to show the total level. Drivers can use this information -- in whichever graph modes are most relevant to them -- to see the impact of speed and acceleration, and then choose the combination that results in the best compromise between performance and efficiency.

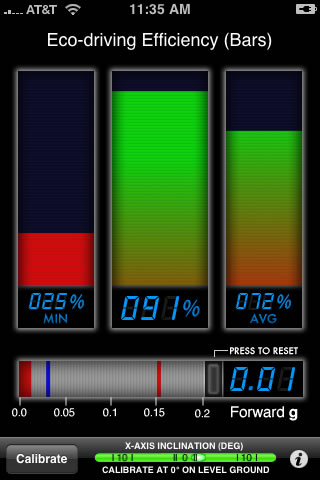
The three eco-driving efficiency displays (gauge, leaf, bar styles) are based on a composite function of these other parameters, and offer a quick, effective way to summarize data, especially when operating greenMeter on the road. These gauges also track the minimum and average efficiency so you can get an idea of efficiency during the duration of your trip.


A forward acceleration g indicator is on the the bottom of the screen, focused to the range of 0.0-0.2g (typical acceleration levels for day to day driving). The indicator has a blue marker showing the average acceleration level, and a red marker showing the peak acceleration level. Both markers can be reset with the button between the bar and numerical readout. This button also resets the average and minimum efficiency levels in the eco-driving displays discussed above.

Tip: You can experiment with the various display modes in greenMeter without getting in the car. First, lay your iPhone or iPod Touch on a flat surface (like a desk) and calibrate greenMeter. Now, if you pick up the device and tip it vertically, the acceleration of gravity will act like a vehicle's forward acceleration. By tipping the device up and down, you can carefully study the displays in greenMeter and see the effects of acceleration. There is considerable information to be learned with zero acceleration too. In this case, you can see the impact of cruising speed on power and efficiency. For instance, greenMeter shows a difference of about $300 in fuel cost over 10000 miles between cruising speeds of 60mph and 70mph for a medium sized car.


Setup

Before use, there are a few settings you will want to input. Press the "i" button to enter settings. Here you will find an important option -- a switch that can toggle greenMeter into metric mode, where metric units are displayed and metric vehicle conventions are used.

Next, you can enter your typical fuel cost, and a currency symbol. greenMeter uses this to compute your long term fuel costs.

The ambient temperature is used in the computation of aerodynamic drag. A standard day sea level value of 70F (US units) or 21.1C (metric) can be used to provide "nominal" results. Users can obtain even better results by using a representative average temperature for their location, or by updating the temperature on a seasonal basis.

Next, we come to Vehicle Setup. The first time you enter this section, greenMeter will offer to guide you through the setup by asking basic questions about your vehicle. You can also get to this "easy setup" mode at any time by pressing the help button in the lower left corner of the screen. Choose this "easy setup" option if you are unfamiliar with vehicle specs or don't have particular details about your vehicle. The easy setup mode will fill in the required info based on general guidelines, and will probably get you within 10-15% of actual vehicle characteristics (assuming your vehicle is fairly typical). Note that you can override any of the inputs filled in by easy setup later on if you desire better accuracy.

If you have detailed specs for your vehicle, you'll want to enter them manually, using guidelines discussed here. The first few inputs tell greenMeter how to compute power based on acceleration. First up is the vehicle weight (or mass in metric units). Use a number that reflects the weight of the vehicle, fuel, and driver/passengers -- in other words, a gross weight.

The drivetrain loss number specifies how much power is lost between the wheels and the engine. For a 2WD vehicle with manual transmission, use 0.15 (15%). For a 2WD vehicle with automatic transmission or a 4WD vehicle with manual transmission, use 0.20, and for a 4WD vehicle with automatic transmission, use 0.25.

Rolling resistance is a function of the vehicle tires. In most cases, a value of 0.010 to 0.015 is appropriate. Vehicles with low rolling resistance tires should use a value between 0.006 and 0.010.

Drag coefficient and frontal area determine the aerodynamic drag acting on a vehicle at a given speed. Most cars have drag coefficients in the range of 0.28 to 0.35; trucks and SUVs can be in the 0.35 to 0.45 range. Frontal area is simply the cross sectional or projected area of the vehicle that faces the wind, and is approximately the vehicle width multiplied by the vehicle height, minus the open area between the vehicle, ground, and tires. Drag coefficient and frontal area are usually published by manufacturers or car magazines, and can often be looked up on the internet.

Next, we come to a correction for vehicle pitch. All vehicles tend to pitch backward on acceleration and forward on braking, and this motion could introduce error in measured and computed results. This effect can be offset by telling greenMeter about the pitch characteristics of the vehicle. The default setting is 2 degrees, meaning greenMeter assumes the vehicle pitches back (or forward) 2 degrees for every 1 g of acceleration (or deceleration). This is a good setting for most sports cars. If you have a sports car with a very stiff suspension, values between 1 and 2 degrees may be better. Vehicles with a softer suspension should use a pitch correction between 2 and 4 degrees.

Finally, we come to inputs that greenMeter uses to determine fuel usage. The engine efficiency is a measure of how much of the fuel's chemical energy is converted to mechanical energy by the engine. Most gasoline engines have an efficiency in the range of 0.18 to 0.20 (ie, 18-20% -- not so great). Diesel engines are typically in the range of 0.42 to 0.47 (42-47%).

The segmented button on the bottom allows you to choose the fuel type, gasoline or diesel, which determines the basic chemical energy content of the fuel itself.


Initial Calibration

Before use in a vehicle, the iPhone or iPod Touch needs to be calibrated to correct any accelerometer offsets in the device. The accelerometer used in the iPhone and iPod touch typically has ± 0.04g to 0.06g of offset per axis from the factory. This can be corrected out by using the "Advanced Calibration" option in greenMeter settings, with the device placed face up on a flat level surface (use a level to verify the surface is a good reference). Under normal circumstances, this particular calibration only needs to be performed once.


Vehicle Mounting and Final Calibration

Next, the device needs to be placed in a vehicle. There are a couple basic requirements for positioning and mounting the device, shown below:


greenMeter has a simulated bubble level to assist with horizontal leveling, and lateral positioning is a matter of lining up the device's upper or lower edge with a lateral reference line on the vehicle. Interior features on the dashboard or console can assist with this. You don't have to get real fussy, but the more accurate the positioning, the more accurate results will be. When properly positioned, the short edge of the device should align with an imaginary horizontal or lateral line passing evenly from one side of the vehicle to the other:


The device can be inclined at an angle as long as the previous two requirements are met. In fact, an inclined position can actually improve accuracy!


Some examples of acceptable positioning are shown below:


It goes without saying that you shouldn't take your attention off the road, so if you plan to glance at greenMeter while driving, be sure the iPhone/iPod is positioned like any other important gauge or instrument in the vehicle.

Once the device is positioned properly, make sure it is tied down to the vehicle so that it does not shift position or turn into a hazard when the vehicle is in motion. Various types of iPhone/iPod mounts and cradles can be used, or the device could even be taped down for temporary use.

At this point, you're ready to calibrate greenMeter for orientation within the vehicle. With the vehicle at rest on a level surface, press the "Calibrate" button on the main screen. This will cause the device to detect the vertical direction (by sensing gravity) and take all the other information into account to identify the forward axis of the vehicle. When properly calibrated on a level surface with the vehicle at rest, greenMeter should show zero forward acceleration, meaning the device is now ready to detect forward motion. Calibration values are saved and can be re-used as long as the device position in the vehicle does not change, but greenMeter can be re-calibrated at any time as long as the vehicle is at rest on a level surface.


On the Road

Note: greenMeter should only be used by qualified operators under safe conditions. The software should not be operated by a driver whose vehicle is in motion (have a passenger do it). greenMeter should not be used on public roads if such use violates traffic laws or causes a hazard to others. Please drive safely. The user is responsible for any accidents, property damage, or injuries that occur while using greenMeter. You must agree to the terms of the greenMeter End User License Agreement before using the software.

OK, so greenMeter is calibrated and you have entered the settings you want. Once you start driving, greenMeter will vividly show the effects of acceleration. If you're interested in improving fuel efficiency and lowering fuel cost/usage and environmental impact, you'll see that red is bad. You will want to minimize the amount of red displayed by greenMeter as much as possible, whether you're looking at the eco-driving efficiency, the acceleration display, or the various graphs.

Because the graphs contain a lot of detail that may be too much to process while driving (leave that to your passengers), the eco-driving efficiency displays are the best tools to use to train your driving style. Keep efficiency above 50% if you can, or as high as you can go without impeding traffic or getting run over. It's tough to keep efficiency high in lower gears, but it gets easier in higher gears. Over the duration of a trip, try to achieve a high average efficiency and don't let your minimum level dip too low.

While red is bad on the graphs, blue and purple aren't great either. Though acceleration doesn't affect rolling resistance and aerodynamic drag, vehicle choice and the selection of cruising speed do. So you can exercise some judgement there. Driving a 3000 lb car at 60mph is going to be considerably more efficient than driving a 3 ton SUV at 90mph. In fact, greenMeter shows a significant difference between the two. Over 10000 miles, the speedy SUV would produce 10 more tons of CO2 (14 tons versus 4 tons), use up 24 more barrels of oil (33 versus 9), and cost $3096 more to operate ($3953 versus $857, assuming gas is $2.89 per gallon). Reducing the SUV's speed to 60mph makes a big difference, dropping the carbon footprint to 7.6 tons, the oil consumption to 18 barrels, and the fuel cost to $2188.


Frequently Asked Questions

Does this really work?  Yes. The iPhone and iPod Touch have a fairly good accelerometer and more than enough processing capability to run the measurements and computations needed to make greenMeter practical.

Does greenMeter require an iPhone 3G/3GS with GPS?  No, greenMeter does not make use of GPS in any way. greenMeter will work with any iPhone or iPod Touch running iPhone OS 2.2.1 or later.

Why don't you use GPS to measure vehicle speed?  The short answer is that it's not needed, since greenMeter graphs various effects over an entire speed range. Not only is this more effective, but it also allows greenMeter to be used on all generations of iPhones and iPod Touch.

When I tip my iPhone/iPod by hand, it does not read a perfect 1g forward acceleration, why?  First of all, the pitch correction will impact this, so make sure it's set to zero if you want to do some hand tests of greenMeter. Second, some iPhones and iPods have accelerometer offsets from the factory, which can make a perfect ± 1g impossible to measure without calibration. Be sure you have corrected the offsets by running the advanced calibration in greenMeter settings. With this calibration, the typical factory offsets of ± 0.04g to 0.06 g can be reduced down to ± 0.01g or less.

Does greenMeter require operation on a flat road? No; however, it is important to understand that gravity will induce additional acceleration along the forward axis of the vehicle, and this will show up on greenMeter's display (including a static offset if you stop or park on a hill). While driving on an uphill stretch, the effect of gravity will decrease eco-driving efficiency, increase the required engine power, reduce the fuel economy, and increase the fuel consumption, carbon footprint, and energy impact. In essence, the component of gravity acting along the vehicle's forward axis becomes an additional resistance the engine must overcome (and greenMeter properly reflects this). On a downhill stretch, the opposite will be true.


Support / Contact Info

If you have an issue or question that has not been addressed in the documentation and FAQ, please contact: dev@hunter.pairsite.com. Feedback, comments, and suggestions are welcome.