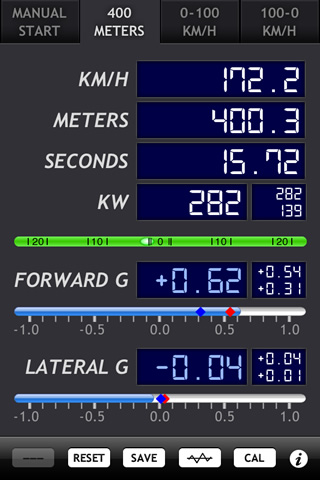
|
About gMeter Getting gMeter The gMeter Interface Setup and Calibration Ready, Set, Go FAQ Support / Contact Info Release History Home ![]() ![]() ![]() ![]() |
Ready, set, gMeter. ![]() 
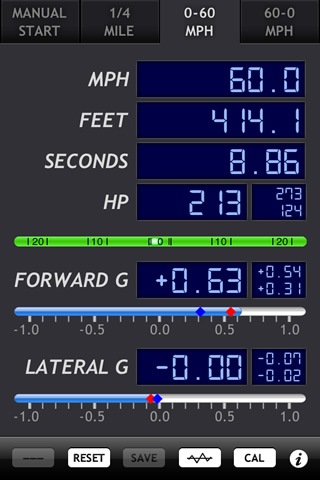
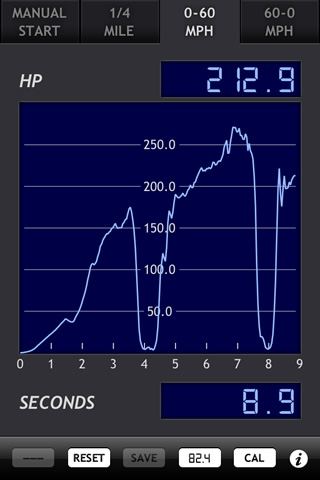
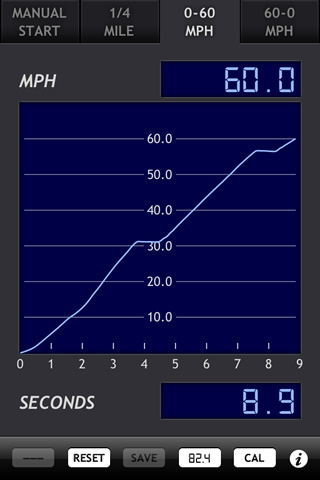
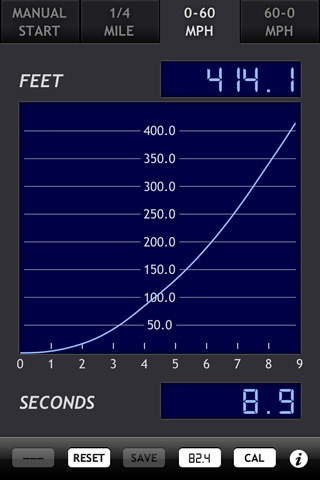
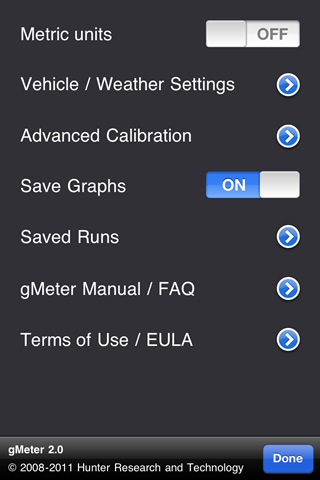
gMeter can display data and compute performance in US or metric units, and data from performance runs (including raw data in time series form) can be saved and e-mailed right from the device. Graphs of speed, distance, power, and forward/lateral g can be displayed, and saved to the photo album for later use or syncing to a computer. 
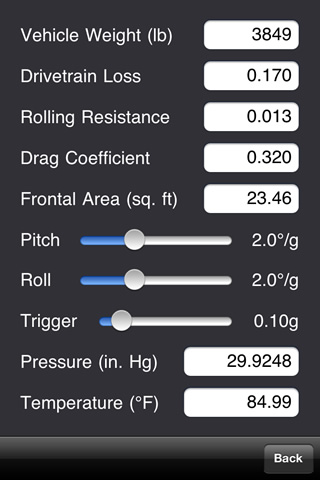
The software has two calibration modes, and offers a correction to account for vehicle pitch under acceleration and deceleration. Engine power computations include inputs for drivetrain loss, rolling resistance, aerodynamic drag, and weather conditions. ![]() ![]() ![]() ![]()
Getting gMeter gMeter is available at the iTunes App Store for $8.99. Click the icon below to go to the iTunes App Store and view the gMeter product listing. ![]() Works on any iPhone or iPod Touch with iPhone OS 2.0 or later The gMeter Interface Features of the gMeter interface are shown below: ![]() ![]() ![]() ![]() Setup and Calibration Before use, the iPhone or iPod Touch needs to be calibrated in two ways. First, any accelerometer offsets in the device need to be corrected. The accelerometer used in the iPhone and iPod touch typically has ± 0.04g to 0.06g of offset per axis from the factory. This can be corrected out by using the "Advanced Calibration" option in gMeter settings, with the device placed face up on a flat level surface. Under normal circumstances, this particular calibration only needs to be performed once. Next, the device needs to be placed in a vehicle and gMeter needs to be calibrated for position with the vehicle at rest on a level surface. There are a couple basic requirements for positioning and mounting the device, shown below: ![]() ![]() gMeter has a simulated bubble level to assist with horizontal leveling, and lateral positioning is a matter of lining up the device's upper or lower edge with a lateral reference line on the vehicle. Interior features on the dashboard or console can assist with this, but don't hesistate to break out a string or measure more exactly -- the more accurate the positioning, the more accurate results will be. When properly positioned, the short edge of the device should align with an imaginery horizontal / lateral line passing evenly from one side of the vehicle to the other: ![]() The device can be inclined at an angle as long as the previous two requirements are met. In fact, an inclined position can actually improve accuracy! ![]() Some examples of acceptable positioning are shown below:
Once the device is positioned properly, make sure it is tied down to the vehicle so that it does not shift position or turn into a hazard when the vehicle is in motion. Various types of iPhone/iPod mounts and cradles can be used, or the device could even be taped down for temporary use on a track day. It goes without saying that you shouldn't take your attention off the road, so if you plan to glance at gMeter while it's running, be sure it's positioned like any other important gauge or instrument in the vehicle. At this point, you're ready to press the "Calibrate" button. This will cause the device to detect the vertical direction (using the acceleration of gravity) and take all the other information into account to identify the forward axis of the vehicle. When properly calibrated on a level surface with the vehicle at rest, gMeter should show zero forward acceleration, meaning the device is now ready to detect forward motion. Calibration values are saved and can be re-used as long as the device position in the vehicle does not change, but gMeter can be re-calibrated at any time (just go through the steps above with the vehicle at rest on a level surface). gMeter is ready to go, but there are a few more settings you might want to tweak. Press the "i" button to enter settings. Here you will find an important option -- a switch that can toggle gMeter into metric mode, where metric units are displayed and metric performance conventions are used. Next, look under "Vehicle / Weather Settings". The first few inputs tell gMeter how to compute power based on acceleration. First up is the vehicle weight (or mass in metric units). Use a number that reflects the weight of the vehicle, fuel, and driver/passenger. The drivetrain loss number specifies how much power is lost between the wheels and the engine. For a 2WD vehicle with manual transmission, use 0.15 (15%). For a 2WD vehicle with automatic transmission or a 4WD vehicle with manual transmission, use 0.20, and for a 4WD vehicle with automatic transmission, use 0.25. If you want to compute wheel horsepower rather than engine horsepower, you can set the drivetrain loss to zero. Rolling resistance is a function of the vehicle tires. In most cases, a value of 0.010 to 0.015 is appropriate. Vehicles with low rolling resistance tires should use a value between 0.006 and 0.01. Drag coefficient and frontal area determine the aerodynamic drag acting on a vehicle at a given speed. Most cars have drag coefficients in the range of 0.28 to 0.35. Frontal area is simply the cross sectional or projected area of the vehicle, and is approximately the vehicle width multiplied by the vehicle height, minus the open area between the vehicle, ground, and tires. Both drag coefficient and frontal area are often published by manufatureres or car magazines, and can usually be looked up on the internet. Next, we come to a correction for vehicle pitch. All vehicles tend to pitch backward on acceleration and forward on braking, and this motion could introduce error in measured and computed results (basically it invalidates the calibration). This effect can be offset by telling gMeter about the pitch characteristics of the vehicle. The default setting is 2 degrees, meaning gMeter assumes the vehicle pitches back (or forward) 2 degrees for every 1 g of acceleration (or deceleration). This is a good setting for most sports cars. If you have a sports car with a very stiff suspension, values between 1 and 2 degrees may be better. Vehicles with a softer suspension should use a pitch correction between 2 and 4 degrees. Through trial and error, the pitch angle correction can be tweaked as needed to improve results. Finally, gMeter has inputs for ambient temperature and pressure. These quantities are used to calculate air density required for the aerodynamic drag computation. If you don't have access to the ambient weather conditions, standard day sea level values of 29.92 in. Hg and 70F (US units) or 101.31 kPa and 21.1C (metric) can be used. However, note that specifying the wrong pressure and temperature can throw aerodynamic drag off by 5-10% or more, which can have a significant effect on computed power at higher speeds. Ready, Set, Go
OK, so gMeter is calibrated, you have entered the settings you want, and you're ready to measure vehicle performance. Let's say you select 1/4 mile timed distance mode. gMeter's start/stop button changes to "Auto", indicating it has gone into hands-free mode and will start automatically. As soon as you accelerate, gMeter will automatically begin measurement and computation. When you reach 1/4 mile distance, gMeter will beep and show the computed performace. In addition to the 1/4 mile speed and time, gMeter also shows the peak and average forward g during the run (it also shows lateral g statistics, which should be very close to zero for a proper 1/4 mile run). If desired, you can save this data (along with raw time series data and graphs) for later viewing or transfer via e-mail. The timed speed modes operate in much the same way as a timed distance run, except gMeter will beep and display computed performance when the target speed is reached (60 mph or 100 km/h, depending on units selected). The timed deceleration mode also offers hands-free automatic operation. gMeter automatically starts off when you first accelerate, and will beep and flash red when a trigger speed is reached (64 mph in US unit mode or 104 km/h in metric unit mode). At this point, you can initiate deceleration. gMeter will begin measuring deceleration and computing data when speed drops back below the target limit (60 mph in US unit mode or 100 km/h in metric unit mode) and stop when zero speed is reached.
A note about data measurement and computations -- accelerometer-based vehicle performance computers work by continuously measuring acceleration (hundreds of times a second) and integrating this data with respect to time to get speed and distance. Because of the ongoing process used to get speed and distance, potential measurement and computation errors in each instant of motion can stack up and cause larger errors in the end result. Thus, accelerometer-based vehicle performance computers are typically not used for measurement over long distances or times. They do provide acceptable results for shorter distances and times, such as the modes offered in gMeter. To ensure the best possible results, follow the calibration procedures carefully and make your peformance runs consistent with the intended purpose of each mode. Timed distance and timed speed assume forward motion and positive forward acceleration in a straight line on a level surface. Timed braking assumes forward motion and positive forward acceleration to reach the trigger speed, and then forward motion with negative forward acceleration during the braking phase (all in a straight line on a level surface). Any deviations from this, such as hesitation in acceleration, driving in a curved path, or driving on an incline, can introduce error into performance calculations and/or compromise the accuracy/relevance of results. That said, if you're just looking for a repeatable way to measure general performance or gauge run to run increments (say, due to engine/chassis modifications or differences in driving style), gMeter results may still be useful in cases where test conditions are not 100% perfect. Like any other tool, the value of gMeter is how you make use of the results and how relevant the results are to you. Frequently Asked Questions Does this really work? Yes. The iPhone and iPod Touch have a fairly good accelerometer and more than enough processing capabiity to run the measurements and computations needed to make gMeter practical. With proper calibration and settings, gMeter can be quite accurate. Regardless of the absolute accuracy, gMeter offers very good precision and repeatability, making it a great tool to look for performance increments from factors like engine and chassis modifications and driving style. Why doesn't gMeter agree with my speedometer? One reason gMeter may not agree with your speedometer is that speedometers are often out of calibration, by as much as 5-10% in some cases (or more if you have changed tire size). If you know your speedometer is accurate, gMeter can differ because of various factors: improper mounting/positioning, improper (or no longer appropriate) calibration, traveling on inclined surfaces, inconsistent acceleration, and improper pitch angle correction, among others. I began running gMeter while traveling at 55mph, but it indicated a starting speed of 0 mph. Why? All accelerometer based devices need some information about the initial speed when they begin measurement and computation. Consistent with its performance modes, gMeter assumes all computations begin at a speed of 0 mph (or km/h). gMeter starts up, but nothing happens, and no g accelerations are measured. There is a bug in iPhone OS 2.1 that prevents the accelerometers from starting up in some cases. If you quit and relaunch gMeter, it should take care of the problem. gMeter indicates lateral acceleration while cornering, which makes sense, but sometimes I see lateral acceleration when traveling in a straight line. Why? Anytime the vehicle is not level side to side, a lateral acceleration will be induced by the component of gravity acting along the lateral axis of the vehicle. This can happen on a banked roadway or even one with a crown from side to side. It only takes about half a degree of lateral inclination to generate 0.01 g of lateral acceleration. During performance computations, small amounts of lateral acceleration are acceptable if they are significantly less than the forward acceleration being measured. As soon as I switch into one of the hands-free automatic modes or reset gMeter, it immediately begins computing even though the vehicle has not accelerated yet. You are either on an inclined surface, or need to recalibrate gMeter. Gravity is inducing a forward acceleration component (relative to the device's accelerometer axes) and tricking gMeter into thinking the vehicle is in motion. How come I am not getting reasonable results from gMeter? Factors such as improper mounting/positioning, improper (or no longer appropriate) calibration, traveling on inclined surfaces, inconsistent acceleration, and improper pitch angle correction can all affect the accuracy of results. Be absolutely sure you are using gMeter in a manner consistent with the various performance modes. They all assume straight line motion (or very close to it) on a level surface. What format is the data saved in? Within gMeter (click the "i" button, then choose "Saved Runs"), results and statistics from each saved run are grouped into a block of text. You can swipe a finger up/down over the saved runs to scroll through them. The runs are time-stamped with the date and time data was saved. gMeter also maintains raw time series data for each run, and this gets saved internally. Exported data that is e-mailed from gMeter is given in the following form for each run:
There is a header section with summary data from the run, and then a raw data section with time series data from the run. This block format would be repeated for each run that is saved to gMeter's storage cache. Data elements are space-delimited, which makes them easy to import into spreadsheet or database software. Though gMeter samples data 50-100 times per second for internal computations, time series data is only saved about 15-25 times per second to reduce data storage requirements (the extra data would be overkill for most graphing and postprocessing anyhow). This results in data spaced in increments of 0.04 to 0.06 seconds. Note that gMeter graphs and caches a maximum of 30 seconds worth of data for each run. |